An "active" network tap
Version 1.2, 20080712
Ok, I know that this is really a multi-nic PC used as a bridge. But, when you've got plenty of hardware sitting around and can't really justify the expense of a high quality gigabit network tap, this works great.
Though I wouldn't advise putting one of these inline with a production network, they are absolutely wonderful to put in front of a suspected compromised host.
I use my bridge primarily in my malware lab, where I study compromised hosts as they contact their botnet controllers and download additional trojans. By studying the hosts that do get compromised, I learn how to better protect the rest of the network.
Caveat: This material is focused on use of the
bridge as an inline device primarily for (1) isolating an attached host
from conducting attacks, and (2) capturing all the traffic to and from that
host. It probably won't help you much if you desire to create a filtering
router. However, it might come in handy if you want to build your own IPS
using something like Snort Inline.
BIG WARNING: Extreme caution must be exercised when working with a
compromised host on the business end of the bridge. Not only could the
compromised host cause damage to your network, it very well could attack some
high profile or government network that could put you in a serious liability
situation. If the nature of the suspect host is unknown, I recommend
starting with the tightest firewall settings possible, then
opening up holes for traffic only when it is known to not cause harm. The
idea of the lab is to collect malware and malware sources, study the
behavior of 'bots', and for confirmation of suspected malware infestation of
the suspect host. So, take small steps, think it through, and keep your
eyes on the traffic log output and one hand on the network plug, ready to pull
it in the event of trouble.
Requirements
- A PC capable of three network cards
- Linux or *BSD (examples are using Debian Linux)
- The following capabilities (Debian Linux packages listed)
A. iproute2
B. bridge-utils
C. iptables
D. arptables
E. tcpdump
- A dhcp server on the LAN connected to the bridge that will provide a predefined ip address to the suspect/trojaned host.
This paper assumes that the user is reasonably familiar with Linux systems administration and the ip, bridge, iptables, tcpdump and arptable utilities. If you're new to these topics, please study, at the very least, the references at the bottom of the page before continuing.
Theory of Operation
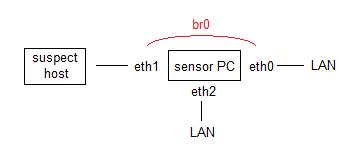
The PC is equipped with three network interface cards;
typically, an onboard NIC and two matching gigbit PCI
cards.
Granted, an ip address could be given to the bridge
itself, making it possible use only two network interface cards on the
bridge host. But, I prefer to use a third NIC for the workstation itself.
I believe this practice creates an extra layer of protection from harmful
hosts attached to the bridge. And, it certainly uncomplicates
network capture files.
In my lab, the suspect host MAC address is already configured in the network's DHCP server to always provide the same IP address with each boot. Likewise, the border router/firewall is configured to block SMTP coming from that IP address, just to make sure a spambot doesn't push any spam, phish, or malware links out of my network.
With the bridge/firewall setup created by the below setup script 'br0_up.sh', the suspect host is allowed to obtain necessary DHCP and DNS services on the local network and access the Internet, but the LAN is fairly well protected. Depending on the behavior of the suspect host, additional rules may be necessary to protect other Internet sites.
In operation, I will boot the bridge host, then connect two ssh sessions from the comfort of my living room. In one ssh session, I run the br0_up.sh script to enable the bridge/firewall, then start a tcpdump capture of the bridge. In the other ssh session, I tail the syslog containing iptables firewall packet data, to closely monitor what goes on.
In essence, the steps are these:
Start the bridge:
./br0_up.sh
Begin the tcpdump capture:
tcpdump -nnvvs 0 -i br0 -C 10 -w BR0-20080404
Keep an eye on the log output in the other ssh session:
tail -f /var/log/bridge.log | grep FWD
To finish the session (1) shutdown the suspect host, then (2) execute ./br0_down.sh.
Summary
Hopefully, this will be enough to get you started. I have no doubt that it will save you hours of research and frustration.
Naturally, no guarantee of suitability or satisfaction is expressed or implied. It works for me, but your results may vary.
If do use this material, I would appreciate hearing from you. Please be sure to offer any suggestions or improvements.
The 'start-up' script:
br0_up.sh
#!/bin/sh
# Copyright (C) 2008 Mark Stingley
# mark AT altsec.info
# This program is free software; you can redistribute it and/or modify
# it under the terms of the GNU General Public License as published by
# the Free Software Foundation; either version 2 of the License, or
# (at your option) any later version.
#
# This program is distributed in the hope that it will be useful,
# but WITHOUT ANY WARRANTY; without even the implied warranty of
# MERCHANTABILITY or FITNESS FOR A PARTICULAR PURPOSE. See the
# GNU General Public License for more details.
#
# See http://www.gnu.org/licenses/licenses.html#GPL or write to the
# Free Software Foundation, Inc., 59 Temple Place, Suite 330, Boston,
# MA 02111-1307 USA
# Version 1.0 - Mark Stingley - First production
ready release
# Version 1.1 - Mark Stingley - fixed DNS rule.
upd instead of tcp. oops!
#
Version 1.2 – Mark Stingley – many port
changes
#Set
up the variables
BRif1="eth0"
BRif2="eth1"
LAN="192.168.0.0/24" #Put your LAN
here
GWAY="192.168.0.254" #Put your
default gateway here
# define
the bridge
brctl addbr br0
brctl addif br0 $BRif1
brctl addif br0 $BRif2
# make forwarding immediate and turn off stp
brctl setfd br0 0
brctl stp br0 off
# bring up
the bridge
ip link set $BRif1
up
ip link set
$BRif2 up
ip link set
br0 up
#Define
the default "log, then drop" chain
iptables -
iptables -A
LOGDROP -j LOG --log-level 4 --log-prefix "br0 DROP: "
iptables -A
LOGDROP -j DROP
#Define
the default "log, then forward" chain
iptables -
iptables -A LOGFWD
-j LOG --log-level 4 --log-prefix "br0 FWD: "
iptables -A LOGFWD
-m physdev --physdev-is-bridged
-m state --state ESTABLISHED,RELATED -j ACCEPT
# Drop all
windows traffic outbound
iptables -A
FORWARD -m physdev --physdev-in
$BRif2 -p tcp --dport
135:139 -j LOGDROP
iptables -A
FORWARD -m physdev --physdev-in
$BRif2 -p udp --dport
135:139 -j LOGDROP
iptables -A
FORWARD -m physdev --physdev-in
$BRif2 -p tcp --dport 445
-j LOGDROP
iptables -A
FORWARD -m physdev --physdev-in
$BRif2 -p udp --dport 445
-j LOGDROP
iptables -A
FORWARD -m physdev --physdev-in
$BRif2 -p tcp --dport
1433:1434 -j LOGDROP
iptables -A
FORWARD -m physdev --physdev-in
$BRif2 -p udp --dport
1433:1434 -j LOGDROP
iptables -A
FORWARD -m physdev --physdev-in
$BRif2 -p tcp --dport 636
-j LOGDROP
iptables -A
FORWARD -m physdev --physdev-in
$BRif2 -p udp --dport 636
-j LOGDROP
iptables -A
FORWARD -m physdev --physdev-in
$BRif2 -p tcp --dport 389
-j LOGDROP
iptables -A
FORWARD -m physdev --physdev-in
$BRif2 -p udp --dport 389
-j LOGDROP
iptables -A
FORWARD -m physdev --physdev-in
$BRif2 -p tcp --dport 143
-j LOGDROP
iptables -A
FORWARD -m physdev --physdev-in
$BRif2 -p tcp --dport 993
-j LOGDROP
iptables -A
FORWARD -m physdev --physdev-in
$BRif2 -p tcp --dport 110
-j LOGDROP
iptables -A
FORWARD -m physdev --physdev-in
$BRif2 -p tcp --dport 995
-j LOGDROP
iptables -A
FORWARD -m physdev --physdev-in
$BRif2 -p tcp --dport 548
-j LOGDROP
iptables -A
FORWARD -m physdev --physdev-in
$BRif2 -p tcp --dport 88 -j
LOGDROP
iptables -A
FORWARD -m physdev --physdev-in
$BRif2 -p udp --dport 88 -j
LOGDROP
iptables -A
FORWARD -m physdev --physdev-in
$BRif2 -p tcp --dport 102
-j LOGDROP
iptables -A
FORWARD -m physdev --physdev-in
$BRif2 -p tcp --dport 3389
-j LOGDROP
iptables -A
FORWARD -m physdev --physdev-in
$BRif2 -p tcp --dport 119
-j LOGDROP
iptables -A
FORWARD -m physdev --physdev-in
$BRif2 -p tcp --dport 563
-j LOGDROP
iptables -A
FORWARD -m physdev --physdev-in
$BRif2 -p tcp --dport 161
-j LOGDROP
iptables -A
FORWARD -m physdev --physdev-in
$BRif2 -p tcp --dport 162
-j LOGDROP
iptables -A
FORWARD -m physdev --physdev-in
$BRif2 -p udp --dport 161
-j LOGDROP
iptables -A
FORWARD -m physdev --physdev-in
$BRif2 -p udp --dport 162
-j LOGDROP
iptables -A
FORWARD -m physdev --physdev-in
$BRif2 -p tcp --dport 42 -j
LOGDROP
iptables -A
FORWARD -m physdev --physdev-in
$BRif2 -p udp --dport 42 -j
LOGDROP
# protect
telnet, ftp, ssh, and smtp
iptables -A
FORWARD -m physdev --physdev-in
$BRif2 -p tcp --dport 23 -j
LOGDROP
iptables -A
FORWARD -m physdev --physdev-in
$BRif2 -p tcp --dport 22 -j
LOGDROP
iptables -A
FORWARD -m physdev --physdev-in
$BRif2 -p tcp --dport 25 -j
LOGDROP
iptables -A
FORWARD -m physdev --physdev-in
$BRif2 -p tcp -d $LAN --dport
20:25 -j LOGDROP
# Drop ssdp
iptables -A
FORWARD -m physdev --physdev-in
$BRif2 -d 239.255.255.250 -p udp --dport 1900 -j LOGDROP
iptables -A
FORWARD -m physdev --physdev-in
$BRif2 -d 239.255.255.250 -p udp --dport 2869 -j LOGDROP
iptables -A
FORWARD -m physdev --physdev-in
$BRif2 -d 239.255.255.250 -p udp --dport 5000 -j LOGDROP
# Drop srvloc
iptables -A
FORWARD -m physdev --physdev-in
$BRif2 -d 239.255.255.253 -p udp --dport 427 -j LOGDROP
# Drop
multicast
iptables -A
FORWARD -m physdev --physdev-in
$BRif2 -d 224.0.0.0/8 -p udp -j LOGDROP
iptables -A
FORWARD -m physdev --physdev-in
$BRif2 -d 225.0.0.0/8 -p udp -j LOGDROP
iptables -A
FORWARD -m physdev --physdev-in
$BRif2 -d 232.0.0.0/8 -p udp -j LOGDROP
iptables -A
FORWARD -m physdev --physdev-in
$BRif2 -d 233.0.0.0/8 -p udp -j LOGDROP
iptables -A
FORWARD -m physdev --physdev-in
$BRif2 -d 234.0.0.0/8 -p udp -j LOGDROP
iptables -A
FORWARD -m physdev --physdev-in
$BRif2 -d 239.0.0.0/8 -p udp -j LOGDROP
# Forward
all other traffic
iptables -A
FORWARD -j LOGFWD
The 'shutdown'' script:
br0_down.sh
#!/bin/sh
# Copyright (C) 2008 Mark Stingley
# mark AT altsec.info
# This program is free software; you can redistribute it and/or modify
# it under the terms of the GNU General Public License as published by
# the Free Software Foundation; either version 2 of the License, or
# (at your option) any later version.
#
# This program is distributed in the hope that it will be useful,
# but WITHOUT ANY WARRANTY; without even the implied warranty of
# MERCHANTABILITY or FITNESS FOR A PARTICULAR PURPOSE. See the
# GNU General Public License for more details.
#
# See http://www.gnu.org/licenses/licenses.html#GPL or write to the
# Free Software Foundation, Inc., 59 Temple Place, Suite 330, Boston,
# MA 02111-1307 USA
# Version 1.0 - Mark Stingley - First production
ready release
#Set up the variables
BRif1="eth0"
BRif2="eth1"
# bring up the bridge
ip link set $BRif1 down
ip link set $BRif2 down
ip link set br0 down
# define the bridge
brctl delif br0 $BRif1
brctl delif br0 $BRif2
brctl delbr br0
iptables -F
iptables -X LOGDROP
iptables -X LOGFWD
Syslog Configuration Recommendation
If you want the iptables kernel messages to go into a separate log, I recommend the following changes to /etc/syslog.conf:
#exclude the kern.warning messages
from /var/log/kern
kern.*;kern!=warning
-/var/log/kern.log
#send the iptables output to /var/log/bridge
kern.warning
/var/log/bridge.log
Linux Bridge
Implementing a bridging-level firewall
https://www.linux-magazine.com/issue/50/Bridgewall_Firewalling.pdf
Performance Evaluation of Linux Bridge. James T. Yu.
http://facweb.cti.depaul.edu/jyu/Publications/Yu-Linux-TSM2004.pdf
Version History:
1.0 20080407 First release
1.1 20080428 changed the br0_up.sh script to '-p udp --dport 53' instead of '-p tcp --dport 53'. This was actually a copy error from another script line, where tcp was used and the error was not noticed at first.
1.2 20080712 numerous changes to the br0_up.sh script, primarily to list destination ports individually. After a lab hardware change, the original script wasn’t allowing dhcp lease traffic.